Tag Archives: DIY

what’s been happening – an update & spoonflower review

A tumble weed rolls through the Made by Mitty blog… I am very conscious, and annoyed by that tumble weed.

As I write this, I am currently 31 weeks pregnant! 31 weeks has absolutely flown by at an alarming rate. It feels like only a few weeks ago that I was sewing and blogging my Frankenshirt. That little top was the last bit of sewing I’ve done for myself since falling pregnant. For me, the first few weeks were horrendous. I felt so sick, had a constant feeling of nausea, coupled with extreme tiredness, which meant that I could barely function at work, let alone go shopping for fabric.

I started to feel human again around week 14, and found myself wanting to sew. But not for me, for our little Peanut (baby has to have a nickname!). I took this opportunity to try out Spoonflower. For a long time I’d wanted to order something from them, but I just never got around to it. Now I had a solid project in mind, I started to search through the masses of patterns and designs.

I finally settled on this gorgeous peanut pattern by katherinecodega, printed on Spoonflowers Cotton Spandex Jersey. I knew it would take a while to arrive but I wasn’t too worried. In the end, it took a few weeks to turn up, so I wouldn’t recommend Spoonflower if you’re in need of something super quick.

Initially, I thought the fabric was a little stiff, but it softened up quite a lot after washing. I had 1 meter to play with, and I didn’t want to waste a single scrap of it.

I started by making the footie coverall from Brindille & Twig. It’s a great little pattern with well written, clear instructions. I did, however, have a bit of a moment when cutting the fabric, and somehow ended up with the front opening being backwards. All my fault, nothing to do with the pattern!

Jumpsuit 1Jumpsuit 3Jumpsuit 2Jumpsuit 4

All in all, I think this is a wonderful pattern. Once completed, I held up a store bought jumpsuit to compare sizes. I found the the Brindille & Twig newborn size runs a little larger than the store bought one, but I think it’s better for it to be a little bigger than a little smaller.

Seeing as Peanut will be born in Winter, I wanted to make a little beanie to go with the jumpsuit. I used the Coral & Co DIY Baby Hat pattern, and made both the small newborn, and the large newborn sizes.

Beanies

I had a decent amount of fabric left over, so I decided to make a bib next. I used this simple pattern from Dana Made It. I decided to make a double layer bib as I thought the jersey wouldn’t stand up to much dribble or puke. I found the softest, most beautiful bamboo double terry from Bamboo Fabric Store to use for the underside of the bib.

Still, there was more fabric to use! I cut out a pair of Just Hatched Leggings and sewed them up.

Leggings 1

While I think this is a brilliant pattern, I also wanted some leggings that didn’t have elastic around the waist. I jigged the pattern a little, and using some grey jersey from my stash, made another pair with a peanut waist band and cuffs.

Leggings 2

With my Spoonflower fabric now resembling scraps more than anything, I managed to squeeze out one more pair of leggings. I made these using my jigged version of the Just Hatched Leggins, but made the waistband and cuffs longer than normal. I can fold these over to fit bub early on, and unfold them when those growth spurts kick in. I think this is called a “grow with me” style.

Folded down…

And folded up…

I’m so happy with all these little makes, baby clothes are so satisfying and quick to make. I’d recommend all these patterns for beginners, except for the jumpsuit, there are a few fiddly elements to it (like the adorable little feet) that are probably a bit advanced for a beginner. But if you’re feeling adventurous, give it a go!

I hope to clean out those pesky tumble weeds and start blogging more. I’ve got a few other projects ticking along that I’ll share with you over the coming weeks.

Mitty xox

when things don’t work out – frankenshirt

Not all of my sewing plans turn out how I’d imagined. It doesn’t seem to happen as much as when I first started sewing, but I still manage to have a #FAIL every now and then. This is how I tried to turn a fail, into a win!

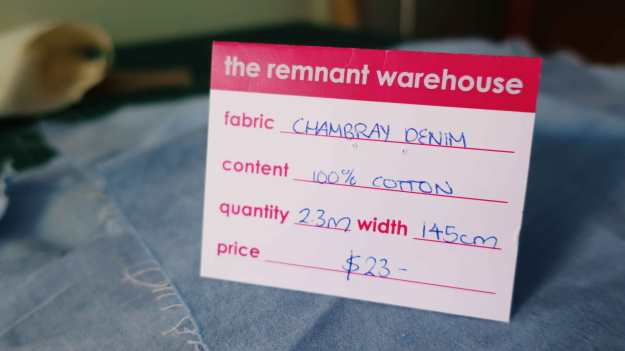
Quite a while ago, I purchased a remnant of 100% cotton chambray from The Remnant Warehouse. It was beautiful and soft, very light weight, and well priced. I noticed a few areas that had faded light damage, but I wasn’t overly concerned about it.

img_3767

My first thoughts for this chambray were to turn it into a casual, spring-time dress, with a gathered skirt, semi-fitted bodice, and little sleeves. In my head, it was a thing of beauty. In reality, it was a disaster. I’d put little to no effort into drafting a proper pattern, the neckline stretched out horribly, and the whole thing had a rather unflattering silhouette. Needless to say, I didn’t take any pictures of it.

img_3761

This is all that remains of fail #1

After FAIL #1, my next idea was to turn the chambray into a pair of shorts. Light, breezy, spring/summer time shorts. I used a pattern I’d used before, and sewed them up! I was about 80% done, and decided to try them on. Well, I tried to try them on.. they were too small! I couldn’t get them up over my thighs.

img_3760

And fail #2

Totally dismayed, FAIL #2 and the scraps sat in my sewing room for weeks. I’d see it every now and then, and felt a stab of disappointment for wasting perfectly good fabric. One day, it got too much, and I decided to fix my fails.

img_3768

I seam ripped all the bits apart, ironed them all, and spread them out on my table to see what I had to work with. Not much, is what I was looking at. I decided to sew all the bits together, in a patchwork kind of way, so I once again had enough fabric to make a simple shell top.

Keeping the grain as straight as possible, I started sewing all the bits together, overlocking the seams, and pressing. Sew, overlock, press. Repeat. After a few hours, this is what I had.

img_3765

I drafted a simple shell top from my bodice block, made a toile so I didn’t screw up this fabric again, made alterations to the pattern, then cut out from the chambray. The only thing I had to keep an eye on, was the placement of the front, which has bust darts. I managed to avoid having any extra seams going into the darts.

Sewing it together was very easy. I made sure to overlock all my seams to keep everything from fraying. I finished the neck and arm holes with the same chambray bias-binding I used on this stripy top.

After a final press, it was ready to wear!

img_8224

img_8200

img_8217

img_8226

As you can see, I added a button closer to the back. I think it works really well, I don’t have to undo it to get it on, however, my binding finish on the split isn’t my best work. Something to practice!

img_8228

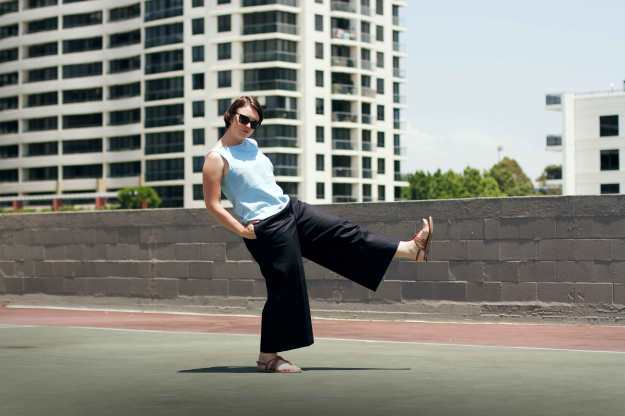
I just love all the different shades in this top, and the angels of the patchwork seams. All the little bits patched together really reminded me of Frankenstein’s monster, so this project has fondly been named, the Frankenshirt.

img_8220

So, what do you think? Did I turn my fail into a #WIN? I think I did, I see the Frankentop becoming a real staple in my summer wardrobe!

Mitty x

box pleat skirt with netting

Here’s a project that was finished months ago, has been worn several times, but hasn’t made it onto the blog. I have no idea why it’s taken me so long, but here it is!

This skirt started, as many do, while browsing Pinterest. I love a high waisted silhouette, and my “SKIRT” board can vouch for me when I said I’d pinned several versions. I’d noticed that I’d actually pinned a few that had sheer or lacy panels, and so this skirt went from being a vague idea, to “This needs to be in my wardrobe NOW”.

I wanted my skirt to have a lot of volume without the need of a tulle layer or padding underneath. I decided to make a box pleat skirt from a thick Ponti di Roma, which would hold its shape well, and be strong enough to support the sheer panel.

img_7902

I bought a swatch of a Ponti that I thought would do the job from Knitwit. I must say, I was super impressed with what turned up. It had a decent amount of body, it was really smooth, and I could just feel that it was a high quality fabric. I bought a meter of it as soon as I could.

Then the hunt began for something sheer to use, and honestly it wasn’t as hard as I thought it was going to be. I found this beautiful netting fabric with ribbon detail at The Remnant Warehouse. They must be sold out of it now because I can’t find it on the website, but I remember the tag saying that it was a Nicola Finetti remnant.

img_7912

 I drafted a quick box pleat pattern that would sit right on my natural waist. The top portion using the Ponti ends just above my knee, with the netting flowing down to a “midi” length. I think this is a really versatile length, as it looks great with flats, or really classy with heels.

img_7915

I used a 20cm invisible zipper down one side seam, so the box pleat pattern wasn’t interrupted.

img_7917

The only part of this skirt that was a bit of a struggle, was hemming the netting. I had to hand sew it,  the ribbon sections were too thick for my sewing machine, so pushing a needle through it for 2 hours was a little painful in the end, but well worth it.

img_7924

I absolutely love it! It looks great with a casual tee for a dressed-down look, I’ve worn it with a close fitting jumper and tights when the weather was cooler, and I can dress it up with a silk cami and heels. It’s become a real workhorse in my wardrobe!

img_7946

 I think I got pretty close to my “pin-spiration”, don’t you?

Mitty x

img_7935

cult hit: white russian

Whoa. Where did the time go? Is it really June already? It’s safe to say that I failed MeMadeMay2016 in regards to blogging about it, and sewing a new item each week (what was I thinking?!), however, I did manage to wear 2 me-made items for the weeks of May. Let’s chalk MMMay2016 up as 45/100, so much room for improvement!

I did actually get one “make” finished during May, and have finally taken a few photos of it. I made the Capital Chic White Russian! The weather in May was actually too warm to wear it (Global warming, I’m telling you!), but now that it’s finally started to cool down, I’ve been able to throw it on a few times.

16062016_01

First, the fabric. I went to The Remnant Warehouse in Alexandria searching for a lovely fleece-backed fabric. They have a few styles of fleece, but I was really drawn to this beautiful navy. Another plus, is that it is 100% organic cotton! YES! I love fabric that can breath during the winter, but also keep you toasty warm! Be on notice, however, like all other fleece fabrics, navy blue fuzz was everywhere after cutting. I used a sticky roller to pick most of it up, but I’m still finding small pockets of fuzz in my sewing room…

The pattern is simple and easy to follow, however I did grade the seam allowances from 1.5cm down to 1cm. Everything else was put together as instructed. I spent a few hours sewing a subtle diamond pattern onto the front and back pieces. It doesn’t stand out as much as I thought it would, but I like the slight change in texture.

16062016_02

16062016_03

I’m very happy with my new jumper, it will certainly get a lot of wear over winter. The fabric washes really well (no extra shedding after it’s initial wash), but it does need a quick press with a warm iron before wearing.

16062016_04

Have you made the White Russian, or any other Capital Chic patterns? I’d love to hear your success stories!

Mitty x

a russian blue called leia

18052016_01

This is what has been distracting me during the MMMay16 challenge, our new little Russian Blue kitten! She is my birthday present, and I just love her! She is 10 weeks old and was a bit shy at first, but now she is very playful!

18052016_02

To try and direct her playfulness away from our hands (and the lounge), I decided to make her a few little toys.

18052016_03

I drew out a very simply pattern in the shape of a mouse, and gathered my materials.

18052016_05

I gave my mouse a furry tummy for a different texture. Then, I picked out two buttons for the eyes.

18052016_06

I added a bit of calico behind the eyes for stabilization, then firmly hand stitched the buttons on.

18052016_07

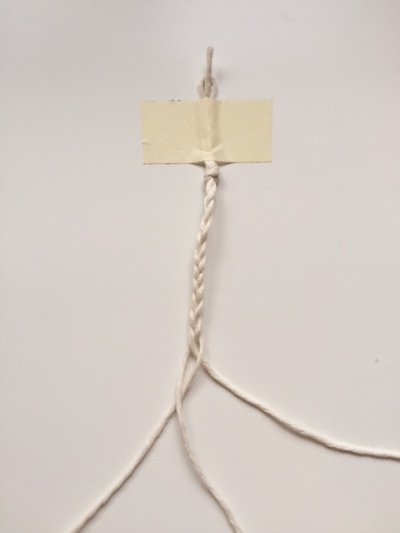
Next, I took some kitchen twine and made a platted tail.

18052016_08

I made sure to place the knotted end of the tail outside the stitching line, so if Leia gives the tail a good tug, it won’t slip out.

18052016_10

I’m anticipating lots of play time with this mouse, so I chose a small zigzag stitch (number 5) instead of a regular straight stitch. The zigzag will be much stronger, meaning less chance of a blow-out.

Once stitched and turned the right way out, I moved onto the stuffing.

18052016_14

I added a wad of dried catnip inside the mouse. To me, it smells like a herbal tea, but I’m hoping that Leia finds it irresistible!

18052016_15

I filled the rest of the mouse with stuffing pulled from a cushion, hand sewed the opening up, and added the ears.

18052016_17

For something different, I put a bell-ball in the pink spotted mouse so it jingles when she plays with it.

18052016_18

18052016_19

18052016_20

And here she is, killing it! Sorry for the blurry pictures, she just moves so fast! I love having her around the house, she is a never ending source of entertainment and joy! She’ll be making the odd appearance on the blog, so keep an eye out!

Mitty x

all the other bits

I’ve gone through the majority of decor items I (and a team of people) made for my wedding in previous posts. Today, I wanted to go through the other little bits and pieces that made the day warm and fuzzy.

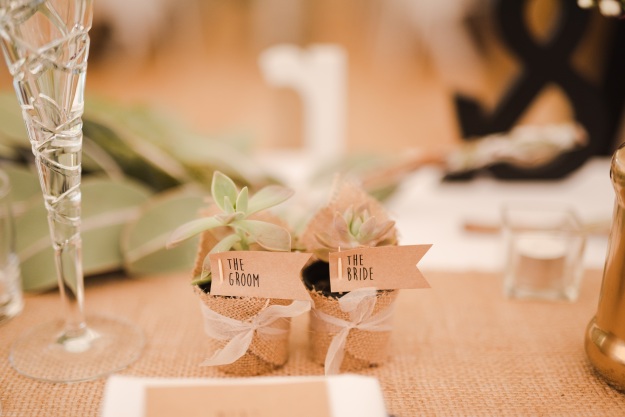
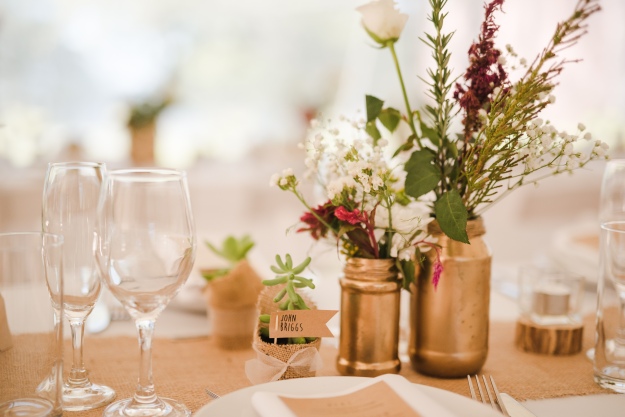
I have to say a massive thank you to my green-thumbed mother, who cultivated and grew 120 tiny succulents to serve as place markers, and gifts for our guests. A week before the wedding, we wrapped each little pot in some hessian. I also tied them up with scraps of silk, left over from my dress.

27042016_01

Once on the tables, we stuck small paper flags on toothpicks into the pots. They looked so adorable, and were a real hit with our guests.

27042016_02

Another big thank you to mum, who cooked and assembled our wonderful wedding cake! I love “naked cakes”, and I think mum’s version was simply perfect! You’ll also notice a little BB-8 perched on top of the cake.. Mum made that as a surprise for Reags, who is completely obsessed with Star Wars.

Photo by James Day

Photo by James Day

I made the “How Sweet It Is” cake topper from some paper, stamps, twine and skewers. Who doesn’t love bunting?!

I wanted to give my bridesmaids a gift that they would be able to use all the time. I decided on personalized leather make-up bags from Mon Purse. I was really impressed with the quality of the leather and zippers used, I’m going to have to get one for myself at some stage.

27042016_04

If you know of our photographer, James Day, you’ll know that he has an obsessions with bow ties. I’m talking, a real, full on collecting obsession. Plenty of his clients have given him bow ties as a gift, but I decided to go a step further, and knit him a one. I knew I’d done the right thing when he opened the box and stammered “…whaaaat? What!?” and gestured me for to put it on him.

Photo by James Day

Photo by James Day

From James Day's Instagram

From James Day’s Instagram

Yeah, I think he was pleased.

To go with the gifts we gave out on the day, I made some really basic cards from grey cardboard from the newsagents. To pretty them up, I cut rectangles out of the left over lace from my dress, and attached it using gold brads.

Photo by James Day

Photo by James Day

Going back to the flower topic, the girls and I had so much fun sitting around making the boutonnieres for the boys. One or two of them may have been a tad too big, but it didn’t matter that much.

Photo by James Day

Photo by James Day

I tried so hard to make my flower crown the day before the wedding, but my mind was on so many other things, I just didn’t have the time to sit down and concentrate on something so delicate. So, I made it the morning of the wedding, after the arch was decorated!

Photo by James Day

Photo by James Day

The final bit of decoration I’d like to show you, is how we presented the seating plan. Each table arrangement was printed on brown paper (with a little bit of gold foiling, which we added later), and stuck onto a huge gold framed mirror. We propped it up on an easel, and sat it on a sturdy table. Nicole then attacked it decorated with greenery.

Photo by James Day

Photo by James Day

I’ll leave you with some pictures of the inside of the marquee.

Photo by James Day

Photo by James Day

Photo by James Day

Photo by James Day

Photo by James Day

Photo by James Day

Mitty x

frames, and a gold back drop

Photo booths seem to go hand in hand with weddings these days, and although we didn’t have one, I still wanted a few simple props that people could pick up and pose with. Picture frames were the obvious choice, they are light, and didn’t take up too much room.

22042016_01

We picked up these second hand frames from a shop in Alexandria. I think we got the lot for $40. Even though the majority of them aren’t the right colours, there were quite a few gold ones that we didn’t have to touch.

22042016_02

A drop sheet and a bit of paint had the frames looking like they were supposed to be at our wedding.

We strung a few up between two trees, had some beside the lounge, and the rest went in the marquee.

22042016_03

For the back drop, I looked a a few different ideas, but settled on this design quite quickly.

I painted a stick white, then tied on about 20 lengths of fishing line. Using a large hole punch, I punched out close to 900 gold circles from cardboard. I then strung these onto the fishing line, and secured with double sided tape. I stuck another gold dot to the back, so that when they moved around, you mostly saw gold. I did leave some white, to add a bit of a difference.

22042016_04

Time consuming? Yes. Involved climbing on a ladder? Yes. Difficult to store? Yes. All those bits of backing tape annoying to remove? Yes.

Pay off? Totally worth it!

22042016_05

Photo by James Day

Photo by James Day

Photo by James Day

The back drop sparkled and twinkled all night! It looked so beautiful! Our photographer, James Day, fell in love with it the moment he saw it. He wanted to take it down and use it was a prop. In doing so, we got some of the most amazing pictures I’ve ever seen!

22042016 _07

Photo by James Day

22042016_08

Photo by James Day

And here’s how he did it, with help from two of my cousins (who were obviously loving the experience!)

I have one more post on our DIY decorations (I know, there were heaps!), then we move onto the fun stuff, AKA shoes and dresses!

Mitty x

the wedding arch

Do you ever have those moments where you know exactly what you want, but no matter how hard you search, you just cannot find it? This was my situation with the wedding arch. I was looking for something nice and simple, that we could attach flowers to, and was strong enough to be moved around. After a few weeks of searching, I realized that I would have to make my own.

Now, remember when you’re looking at the pictures, when I say “make my own”, I really mean “I conned my Dad into building it for me”…

First, we started with some deadwood, stripped the bark off, and cut them to size.

20042016_01

To make transportation easier, the arch would have to be able to be dismantled. After drilling some pilot holes, Dad screwed in some bolts, then chopped the top off them, so it was like a metal peg.

20042016_02

 This peg slid into a corresponding hole on the crossbar. We had to cable tie across the join to keep everything secure.

20042016_03

Testing out the height of the cross bar

To make the arch stand up on it’s own, we used some metal buckets, with a plastic pipe in the center, then filled around it with quick-set concrete. The bottom of the arch could slide in and out of the pipe.

20042016_04

On the morning of the wedding, we assembled the arch, and got to decorating it.

20042016_05

Yep, that’s me in my PJ’s…

I tied strips of white fabric to the cross bar and sides, then added the frame for the flowers. You can just see them in the picture above, I used chicken wire which was bent into an L shape. These were cable tied to the arch, then filled with flowers.

20042016_06

20042016_07

I really went to town with this, not only because I think it looked amazing over-stuffed, but I didn’t want any of the chicken wire showing.

20042016_08

The arch turned out exactly how I wanted. I’m so thankful that my Dad had the skills (and basically a workshop full of tools) to be able to bring the arch to life! It was the perfect frame for such a beautiful view.

20042016_09

Photo by James Day

Mitty x


old suitcase wishing well

The ‘Wishing Well’ wasn’t something that I had planned, and the idea really came to us when we stumbled across something similar in one of Newcastle’s second-hand shops.

We found this perfect vintage looking suitcase in the same shop, and bought it for $25. The closures didn’t work, but that was because the bottom front panel had been bent so far back. Once it was straightened up, the case shut and locked nicely.

15042016_01

 Dad cut some MDF small enough so it would slip behind the metal rim running around the top of the case.

15042016_02

Using PVA, I glued a layer of wadding to the MDF. I also cut a smaller piece and stuck it on top, so there was a bit more height.

15042016_03

Next, I cut some printed hessian, making sure I had enough to fold over to the back. I used a staple gun to secure the hessian.

15042016_04

Then, using some black elastic, I wrapped it over the front on a diagonal, stapling the ends on the backside.

15042016_05

With all the hessian and elastic wrapped over the edges of the MDF, it was a bit of a squeeze getting it back into the suitcase! With a bit of force, it popped right in.

15042016_06

I was thrilled with how it was coming together, but I felt like the bottom half of the case needed some attention. We ended up gluing another bit of MDF into the bottom of the case as well, to help balance out the weight of the top. To hide it, I simply glued in more of the hessian.

15042016_07

Once the glue had gone off, I removed the pegs, and it was ready to go! Later on, Dad added some twine to the sides so the lid of the case would sit open on it’s own, without having to prop it up against something.

15042016_08

Photo by James Day

Here it is all set up on the day. We had some pictures printed of all the places we’d like to go on our honeymoon, and slid them behind the elastic. I think it looked really lovely, and I’m so happy that we’ve given this old case a new life.

Mitty x

jars and flowers

Flowers are always a big part of a wedding, they look lovely, and can easily carry your colour scheme throughout the whole day. I knew what kind of flowers I wanted, but what do you put them in? I decided on gold jars!

For a good 11 months, we collected all types of jars. Short ones, tall ones, fat one, tiny ones. Cleaning and removing the labels was easily the most frustrating and time consuming part. Some came off with hot water, others had copious amounts of sticky residue that was a pain to get off.

We bought some gold spray paint from Bunnings (I think we went through about 4 cans), and started spraying!

13042016_01

We would spray jars every few weeks, so we didn’t have to spray them all at once.

13042016_02

I think we ended up with about 80 jars. I was a bit concerned that the paint might chip or scratch off, so we tried putting a clear spray lacquer over the top. I don’t know what happened, it must have reacted with the metallic particles, because it made the gold paint melt and run off the jar! We were even using a “professional sealing lacquer” from an art shop! Anyway, the jars held up brilliantly without any kind of sealing.

Onto the flowers! I really wanted to use as many Australian native flowers as possible, they are extremely durable, and the colours played in with our theme perfectly. We went to the Sydney Flower Markets on the Thursday before the wedding, and spent close to 2 hours walking around, picking out the most beautiful flowers! Our plan was to first look for maroon colours, then white, accents, and finally, foliage. By the time we’d finished, the car was packed, to say the least!

13042016_03

The boot was full too!

We got so many different varieties of flowers, and I’m going to attempt to name as many as I can remember…

Protea (I’ve just found out that these are in fact, native to South Africa, not Australia!) in both pink, and cream. Devils Blush. Billy Buttons (those adorable yellow pom-pom things). Celosia (or Brain Celosia, the internet informs me). Eucalyptus/ghost gum leaves. Cockscomb flowers. Kale roses. Daisies in both white, and burgundy. Roses in white, yellow, and pink. An absolute mountain of Babies Breath!

13042016_04

Jars and bits of flowers everywhere!

In terms of arrangement, I really wasn’t too fused about how things came together. I let Nicole and Nyome (my bridesmaids) create their own bouquet, and I did mine. With all the left over flowers, we divided them up between all the jars. I kept some of the larger ones for the wedding arch (you’ll see that in another post), and we pretty much used every single flower!

13042016_04

Photo by James Day

13042016_05

Photo by James Day

13042016_06

Photo by James Day

13042016_07

Photo by James Day

The flowers looked so striking in the gold jars, and I was really happy with the overall look. As you can see in the picture above, we also used some rosemary in a few of the jars, which gave off a very subtle perfume.

13042016_08

Photo by James Day

I love big bouquets, and ours turned out massive! They were heavy too, but I enjoyed feeling the weight of them throughout the day. I absolutely love this picture, the colours are so vibrant, and all the different flowers just work so well together.

I can’t wait to show you more of my DIY wedding, so stay tuned!

Mitty x